Best Car Component Speaker Installation Service and Cost In NM City
Mobile Auto Truck Repair NM City
Car Component Speaker Installation Service near NM City: Are you looking for the Best Car Component Speaker Installation Service near NM City ? Mobile Auto Truck Repair NM City, Depending on your vehicle and where you choose to place your components, they may require drilling or cutting. But don’t be intimidated; this installation guide can help even first-time installers find their way through the process. Cost? Free estimates! Send us a message or call us today. Best Car Component Speaker Installation Service around NM City. We serve NM City and other areas. Get a Free Quote Now!
BEST CAR COMPONMNT SPEAKER INSTALLATION SERVICE IN ALBUQUERQUE NM IA
ALBUQUERQUE NM CAR COMPONMNT SPEAKER INSTALLATION
Car Component Speaker Installation Service near NM City:
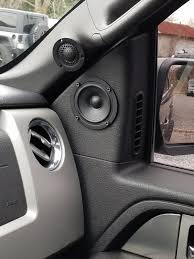
At Mobile Auto Truck Repair NM City, we’ve never settled for ho-hum car sound and speakers firing at your knees leave a lot to be desired. For the best possible sound in your car, we recommend a component speaker system. Separate tweeters and woofers will mean a little more work on installation day, but years of enjoyment thanks to the three big audio advantages of component speakers.
Driving responsibly on the road requires that you avoid distractions as much as possible. For example, it’s a good idea to turn off your mobile phone, or put it in silent mode, so that you don’t get distracted by text messages (in fact, it’s illegal to use a hand-held mobile phone while driving on roads).
Unfortunately, automakers often install low-quality speakers in their cars (in order to save costs) that don’t sound great at low volumes. One solution is to invest in a quality component speaker system that increases the audio quality.
What are component car speakers?
Normal coaxial speakers, whether factory-installed or aftermarket, combine the woofer and tweeter into one speaker. It’s a convenient way to get decent sound from a single speaker opening, but the design of the woofer and tweeter are both compromised in this arrangement.
Component speakers, on the other hand, separate the two drivers and introduce a crossover to define the frequency range that each driver should operate at. Tweeters handle the subtle high range and, since higher frequencies are more directional than lower, they are mounted close to ear level. Woofers are usually mounted in your vehicle’s factory locations, most likely in the doors. Free from any physical interference from the tweeters, the more resonant low frequencies will create a solid foundation for the detailed highs.
Benefits of component speaker
- Tonal clarity
The tweeters and woofers, in a component speaker system, are free to work at an enhanced level. More specifically, they will perform at a higher level for the frequencies assigned to them. An external crossover ensures that frequencies above a fixed point go to the tweeters, and those below go to the woofers. This prevents the different drivers from stretching to play frequencies that they can’t handle, increasing the definition of individual sounds and boosting the overall clarity.
- Soundstage
Soundstage is the perceived wideness and depth that the speakers project. Instead of the music sounding like it’s coming from inside or close to your head, a well-set-up component speaker system will sound more spacious. A perfect example to illustrate this is the difference between a standalone speaker and a complete home theatre setup. When you compare the sound quality in a room, excellent Dolby Atmos soundbars will absolutely outshine a lone loudspeaker in terms of soundstage.
- Sound imaging
Sound imaging refers to the perceived spatial locations of the sound sources in a sound recording, both laterally and in depth. It’s most readily appreciated in classical recordings, where various instruments are seated in different locations. By positioning the various parts of a component speaker system (tweeters, woofers and crossover) strategically, within your car, you can improve the sound imaging and create a three-dimensional reproduction of the music.
- Customizability
Another advantage of component speaker systems over their coaxial counterparts is their higher level of customizability. For example, component speakers have split drivers, which means that you can configure them differently through an equalizer.
- Modular system
A complete component speaker system includes tweeters and woofers among other components. The modular nature of this setup means that you can add additional, or upgrade specific, components incrementally and cost-effectively.
Component speakers installation
Car Component Speaker Installation Service near NM City: Component speaker systems use separate woofers, tweeters, and crossovers to send out detailed, dynamic sound. The crossovers send the low frequencies to the woofers and the highs to the tweeters, freeing up each driver to play with incredible clarity. Component speakers offer the listener greater imaging possibilities than full-range speakers via increased flexibility in placement, aim, and control. Getting the great sound that components have to offer does come with a price. Component speaker installations generally require more time and effort than coaxial speaker installations. Depending on your vehicle and where you choose to place your components, they may require drilling or cutting. But don’t be intimidated; this installation guide can help even first-time installers find their way through the process.
What this guide provides
This installation guide will help you decide on the best location for your new components, as well as help you prepare for and complete the installation.
Woofer placement
The dash, doors, and kick panels serve as the most common homes for woofers. In many cases, you’ll be able to mount the woofers in the factory speaker locations with little to no adjustments to the easy fit option. At most, you’ll have to drill extra screw holes, cut a small area of metal or pressboard, or file the door panel. Modifying fit speakers requires a greater degree of cutting and drilling. Before you begin, you must be sure that modifications will not interfere with any car mechanisms, and that the speakers will fit securely. Though you can relocate any speaker, whether it be “easy” or “modify” fit, be aware that the process can be complicated and time-consuming, especially for first-time installers.
Tweeter placement
Many people choose to install their tweeters on the doors, the sail or kick panels, or the dash. Tweeter installations require some panel modifications, as very few vehicles come with factory tweeter mounts. The degree of modification depends on the mounting method. Just as it sounds, surface-mounting places the tweeter on top of a surface, with little to no modifications necessary. Of course, this method will leave you with a more noticeable installation. A flush-mount, on the other hand, gives a smooth, customized look. It requires cutting a hole into the door panel for the tweeter so it sits level with the interior panel. Whichever method you choose, most manufacturers recommend that you mount your tweeters within 12 of the woofers. Otherwise, the high and low frequencies may reach your ears at different times, resulting in a sonic wave cancellation or phase interference.
Crossover placement
Though crossovers usually require little in the way of car adaptation, finding the right place to house them can be tricky. The crossovers need to be kept in a place where they won’t interfere with any of the car’s moving parts, and where they won’t get wet or vibrate. While some people choose to permanently mount them under the seats or on display, it’s often just as easy to find a convenient spot for them behind the mounting panel near the speakers. The closer the crossover is to the speakers, the better, as the proximity will cut down on noise. The doors and behind the kick panels serve as two good options for housing crossovers.
When to use new wiring
If you’re powering your new speakers with a factory or aftermarket stereo, the factory speaker wire already installed in your vehicle should work just fine. However, if you plan to install an external amplifier that’s rated at 50 watts RMS or more per channel, then we recommend you run new speaker wire. 14- to 16-gauge wire should do the trick when running new speaker wire.
Add-ons
The following installation instructions will also apply if you are adding a set of speakers (midranges, tweeters) to your current aftermarket system.
Remember, as with any electronic installation, disconnect the negative cable on your battery before doing anything else. Also, make sure you have the necessary tools on hand (see above for details).
Door mounting woofers
Most car manufacturers build the factory woofers into the door and, often, your new woofer will easily fit into that factory speaker hole. You may still have to dismantle part of your door to install it, however. Here’s how:
Removing the grille
With a flathead screwdriver, gently pry off the grille of the existing speaker. Car manufacturers usually create a notch in the grille for this very purpose. Grilles secured to the door or attached by friction fittings will require unscrewing or more aggressive prying.
Removing the door panel
You may need to remove the door panel to access the factory speaker, or to custom install your speakers. In this case, start by removing the window crank (if you have one). A screw at the pivot secures some cranks, but most come anchored by a spring clip. You can use a window-crank removal tool (available from Crutchfield) or a flathead screwdriver to remove this clip. To remove, depress the door panel until you can see behind the crank, turn the lever until you see the prongs of the clip, and gently push the crank off with the screwdriver. The clip will pop off, so be careful.
Remove armrest and rest of panel
Next, you’ll have to remove the armrest by unscrewing a few phillips-head screws and some trim fittings around the handle. Once the armrest is unattached, you can remove the door panel. For most cars, you’ll find the panel fastened by a few screws and friction fittings. With the screws removed, begin prying off the door panel at the bottom corner. Use a panel tool (available from Crutchfield) or, if you don’t have one on hand, two putty knives can also do the trick. Once you loosen the bottom and sides, the panel should hang from some trim at the window well. Simply lift up on the trim, and the panel should come free.
Remove the old speaker
Carefully lift out the old speaker and detach it from the wiring harness. Some manufacturers use a sealant foam when mounting the original speakers, so you may need to cut through that with a utility knife. Set the factory wiring harness aside. You’ll need to wire the woofer to the crossover before routing it to the head unit. See Page 5 for more wiring instructions.
Make adjustments accordingly
Usually, you’ll be able to fit the new speaker into the hole with no difficulty, but sometimes the hole can be too narrow or shallow to accommodate it. In this case, you may have to file or trim part of your door or speaker opening, or anchor your speaker basket to the mounting location.
Surface-mounting
You should surface-mount your tweeters if you want to minimize labor time and modifications, or if you don’t have the depth to flush-mount. Surface-mounting may also offer greater angle range than flush-mounting. With a surface-mount, a cup secured to a surface with a screw holds the tweeter in place. You will need to drill a small hole in the panel to secure the mounting cup and run the speaker leads to the tweeter (see previous page for instructions on removing the door panel).
Flush-mounting
The advantage of a flush-mount lies in its sleek, factory-look, since the tweeter does not protrude from the panel. Many manufacturers also include angle-mounts that allow you to aim the tweeters slightly, even when they’re mounted within the panel. When flush- or angle-mounting your tweeters, you’ll need to drill or cut a hole in the panel to accommodate the entire tweeter.
Installing flush-mount tweeters
First, trace the tweeter cup on the panel or dash. Use a drill with a serrated circular blade to cut the hole, and then trim it with a sharp knife. Mount the tweeter (your tweeter will come with specific instructions for this step).
Protecting the crossover
Make sure you house the crossover in a dry place, such as in a hollow space behind the plastic door panel. If you must mount it on the door metal, wrap the crossover in a plastic bag and tape the openings to keep it safe from moisture.
The crossover should be secure against vibration. Merely placing the crossover in the door or kick panel leaves it likely to be tossed around. Also, as with the speaker installation, you’ll want to make sure the crossover does not interfere with any moving parts. Put the crossovers through the same rigorous tests as you did the speakers, specifically with respect to window and door mobility.
Wire networks
Since you’ll most likely install the components in new, unwired locations, you’ll have to spend some extra time wiring them. Component speakers also come with external crossovers, so the wires running from the receiver must first be routed to the crossover, and then to the individual woofers and tweeters. If connecting an amplifier as well, the amp should be wired between the receiver and the crossover.
Wiring through existing door boot
Once you’ve found the best location for your component system, you’ll need to hook it up. Fortunately, most cars sport a rubber boot that connects between the door and the car body. Using this boot as a conduit, run your speaker wires off the door, underneath the kick panels, and to your receiver or external amplifier. You can easily do this by taping the wire to a straightened coat hanger and fishing everything through the interior panels.
Test-driving your system
At this point, you’ll want to test your system before fully reassembling your doors. Loosely attach the door panel to the door, barring the window crank. If you chose to bottom-mount your speakers, mount your speakers in the door before hanging the panel. Holding the speaker in its new hole, mark the screw holes; then remove the speaker, and drill accordingly.
Pull the wires through the door and attach them to the speaker. As long as you’re consistent, it does not matter which terminal you use as positive and negative. Next, hang the speaker in the door. You may need to use “speed” clips (often provided) to give the speaker screws extra support. With all speakers in place, you can listen to your stereo to make sure it works to your liking. Once you’re satisfied, finish reattaching your door panel.
Cutting a wire hole
If your car doesn’t have a rubber boot, you’ll have to drill a 5/8″ hole to string the wiring through. Before drilling, make sure the hole will have access to the desired speaker location, as structural steel sometimes blocks the edge of the door. Cover any sharp edges of the hole with a rubber grommet, several layers of electrical tape, or some flexible tubing. Make sure the door will stay open all the way, and that the wire will not get pinched by the hinges or door jamb. Once you finish drilling and cutting, vacuum all metal debris before finally installing the speakers to prevent rattling or shorts.
Custom woofer installation
Nothing competes with placing your speakers in the location that you determine emits the best possible sound. You may even end up locating your woofers in locations that don’t already have speaker holes. In that case, you need to make some. Here’s what you need to know.
For more information on this, check out the Mobile Auto Truck Repair NM City.
TIPS
Car Component Speaker Installation Service near NM City: Choosing a professional to install speakers ensures the job is done right.
Some general steps for car speaker’s installation:
- First of all you should disconnect the battery that supplies the power.
- Disassemble the doors you wish to insert the audio system in
- Eliminate the default speakers
- It also requires expulsion of dash, or back shelf interior boards to get to the speaker mounting place
If you’re thinking about upgrading your car audio, there are a few things to keep in mind. And it all starts with where the weakest part of the system is. Not enough volume? Lack of solid bass response? Figuring out the weakness helps you formulate a plan of action.
New car? Take the turn-it-up test.
You just bought a new car or truck – and you love it. It smells good, looks good, drives like a dream… and there’s not a single M&M or runaway french-fry under the seat. (Yet.) Awesome, congratulations. Now, get in the driver’s seat and play the stereo. Loud. As in All The Way Up Loud.
Assuming you‘ve already done this, two things: 1) We’re not here to bum you out or tell you anything you don’t already know, like your new car audio is seriously lacking, and 2) You’re not alone. Truth is, every new car and truck comes with less-than-impressive sound systems (even premium sound systems can be improved upon, believe it or not). The good news: upgrading your car’s sound system won’t cost a fortune or require ruining your car’s clean original equipment manufacturers (OEM) look. More on that in a moment.
Older car? Skip the turn-it-up test.
You know your car like the back of your hand. And though you can’t turn back the odometer or make it look showroom clean, it’s a good car in spite of its age. (Note: Eddie Van Halen is 62. Aretha Franklin is 75. Both still bring the house down.) Our point is that no matter how old your car is, you can get that new car buzz back again with a killer sound system in one of two ways: 1) By replacing elements of the sound system – speakers, amps, touch screens, etc. – in a way that doesn’t change your car’s OEM look, or 2) Going all in with a balls-to-the-wall car audio system that’s more about blowing your mind vs. keeping a look.
Choose the right speaker size to fit your car.
There are tons of car speaker size options to choose from.
If you’re looking to keep your car’s OEM look, then you want to replace your existing speakers with speakers of the same size. (Have 6.5 speakers in the front doors of your Honda Civic? Get 6.5 speakers as replacements.)
Stick with your current car speaker style.
Before you start looking at new car speakers, you’ll want to know if your current speaker style is component or coaxial. Depending on which one you currently have, you’ll want to keep it consistent when you shop for new speakers.
COST
How much does it cost to get a new Component Speaker Installation in your car?
Shop car electronics professional installation
Entertainment Regular Price
Advanced In-Dash Navigation or
In-Dash Video Installation $99.99
Standard Speaker Installation $64.99
Component Speaker Installation $99.99
Rear-Seat Video Installation $119.99–$199.99
Cost for new speakers
In terms of costs, again, the sky’s the limit.
A speaker upgrade can cost as little as $100 up to several thousand dollars depending on the scope of work and type of speaker. Cook says the cost of a subwoofer can run as low as $37.Mobile Auto Truck Repair NM City sells a subwoofer package that includes an amplifier and an enclosure for $299.
For a pair of car speakers, Mobile Auto Truck Repair NM City start prices at $39, with an average cost of about $70 for installation. Adding an anti-vibrator to a pair of speakers costs another $25.
Nevitt, meanwhile, charges as little as $99 for a pair of some decent speakers. The cost of an hour of installation, which is typically how long it takes to install a pair of speakers, is $67.But most customers spend much more.
Paying a total of $800 to $1000 is not out of the realm of possibility.
FREQUENTLY ASKED QUESTIONS
What are component car speakers?
Normal coaxial speakers, whether factory-installed or aftermarket, combine the woofer and tweeter into one speaker. It’s a convenient way to get decent sound from a single speaker opening, but the design of the woofer and tweeter are both compromised in this arrangement
What advantages do component speakers have over their counterparts coaxial speakers ?
Because component speakers separate all their drivers, they can provide better stereo-imaging as well as much more detailed and rich sound than you could expect from coaxial speakers.
What we like the most about component speakers, is that you can mount the tweeters wherever you assume they can perform at their best. Additionally, the separate crossovers will forward the highs and lows to the proper driver – highs to the tweeters and lows to the woofers. As a rule, if you want your component speakers to really shine out, you’ll want to drive them by an external amplifier.
My new component speakers aren’t what I’ve been expecting. What’s wrong ?
There are a few things you need to do to get your speakers to sound at their best:
- Check your tweeter attenuation switch – Try switching it off to attenuate the highs that overpower the sound output.
- Are your speakers properly powered? If you’ve got some power greedy speakers, don’t expect too much out of them if you’re running them off your receiver. Remember that by under powering your speakers, you risk voiding your warranty.
- You might want to consider installing foam baffles and dynamat in your doors
Which car speakers will fit my car ?
Car speakers are classified by cone size. This size isn’t the only thing you’ll have to take into consideration. Sometimes speakers are too deep for the locations they’re meant to go in. Different speakers can fit different enclosures by using mounting brackets. In addition, sometimes minor modifications are necessary to make your speaker fit their mounting location. Almost all online retailers including Amazon carry a huge database of car’s brands, make, year and models and thus they’re able to tell if a given set of speakers will fit your vehicle or not.
Can I install my new car speakers myself ?
Yes you can, It’s not that complicated at all, especially if your speakers are of coaxial type. If that’s the case, then it’s just a matter of removing the old speakers and dropping the new ones in their mounting locations, connecting a few wires and you’re good to go. However, if you’ve bought component speakers, then be prepared to put in some effort into installing them.
Can I keep my factory speaker’s wires ?
Factory speakers wires are just fine. They can be used with aftermarket speakers if you’re running them off a factory or aftermarket stereo. However, if this is your first step in upgrading your entire sound system, and you intend to add one or multiple sub(s) and amp(s) down the road, then it’s highly recommended to change these wires.
Do speakers with higher sensitivity rating sound better ?
Sensitivity rating doesn’t tell you how good or not so good a speaker sounds. It only indicates how effectively your speakers convert power applied to them into volume. However, the higher the better. Don’t get us wrong, speakers with low sensitivity rating can also sound great, but they require a very powerful external amplifier or a high-powered receiver.
How much power Is enough for my new speakers ?
The amount of power your speakers require is nominated by RMS power handling (Root Mean Square), exceeding this power range by a little bit will boost your overall sound quality. That being said, a speaker with lower RMS power handling is best suited for being powered by a factory or aftermarket stereo, while speakers with higher RMS will work better with an external amp.
It’s important to match up your speakers with the right amp. Make sure the RMS number on your amp matches the RMS rating on your speakers. If there’s a huge gap between the power handling rating of both your speakers and amp, your speakers could be under-powered, or even overpowered, which could put your speakers at risk. However, technically speaking, the risk of under-powering your speakers is much greater than overpowering them.
CALL US FOR:
- Car Component Speaker Installation Service Near NM City
- Installing Component Speakers With Amp
- Installing Component Speakers Without Crossover
- How To Wire Component Speakers To 4 Channel Amp
- Best Component Speakers
- Installing Component Speakers Without Amp
- Car Audio Crossover Installation Diagram
- Do Component Speakers Need An Amp Near NM City
- 5” Component Speakers
- Best Component Speakers For Car
- Car Speakers 6 Inch
- Car Speakers Price
- Car Component Speakers
- Car Speakers Sony
- 4 Inch Car Speakers With Good Bass
- Best Speakers For Car
- Sony 500 Watt Car Speakers Price Near NM City
Service Area
- Coralville Car Component Speaker Installation Service near me
- Hills Car Component Speaker Installation Service near me
- NM City Car Component Speaker Installation Service near me
- Johnson County Car Component Speaker Installation Service near me
- Kalona Car Component Speaker Installation Service near me
- Lone Tree Car Component Speaker Installation Service near me
- North Liberty Car Component Speaker Installation Service near me
- Oxford Car Component Speaker Installation Service near me
- Riverside Car Component Speaker Installation Service near me
- Solon Car Component Speaker Installation Service near me
- Swisher Car Component Speaker Installation Service near me
- Tiffin Car Component Speaker Installation Service near me
- University Heights Car Component Speaker Installation Service near me
- West Branch Car Component Speaker Installation Service near me
- West Liberty Car Component Speaker Installation Service near me
BEST CAR COMPONMNT SPEAKER INSTALLATION SERVICE IN ALBUQUERQUE NM
MOBILE MECHANICS REPAIR ALBUQUERQUE NM
REQUEST MORE INFORMATION. CONTACT US NOW!
Contact Details
Mobile Mechanic Service Albuquerque
Best Mobile Mechanic & Mobile Auto Truck Repair in NM City NM
CALL: (505) 485-1736 MOBILE MECHANIC 1
CALL: (319) 359-6136 MOBILE MECHANIC 2
CALL: (319) 471-4590 TOWING & ROADSIDE ASSISTANCE
OPEN 7 days 24 Hours
SERVICE AREA: NM City
ABOUT US
Mobile Mechanic NM City: Since 2018 MOBILE MECHANICS REPAIR ALBUQUERQUE NM has been providing reliable mobile repair services to NM City and surrounding areas. Our mechanics cover a 75 mile radius around NM City and are capable of handling any vehicle problems you may have with your truck, RV, or car. We provide mobile mechanic services 24/7 and we’re just a call away from getting you going again.
Onsite Automobile Mechanic NM City: With our traveling mechanic service, we will come to your aid and rescue. We can help and get you and your car back on the road. Mobile Auto Repair, We Bring the shop to you. Onsite car and automobile 911 repair service. Your Car’s local emergency services on the go near Albuquerque, NM.
#mobilemechanicNMCity
#mobileautorepairNMCity
#mobiletruckrepairNMCity
#onsiteautorepairNMCity
#roadsideassistanceNMCity
#24hourautorepairNMCity
#24hourtruckrepairNMCity
CALL US FOR
- 24 Hour Auto Repair
- 24 Hour RV Repair
- 24 Hour Truck Repair
- Auto Repair Shop
- Auto Repair Shops and Mechanics
- Batteries
- Car Repair
- Car Repair and Maintenance
- Car Service
- Emergency Auto Services
- Flat Tire Repairs
- Jumpstarts
- Mechanic
- Mobile Mechanic for Cars
- Mobile Mechanic for RVs
- Mobile Mechanic for Trucks
- Mobile Repair
- Mobile Welding
- On Site Auto Repair
- On Site Brake Repair
- Radiators
- Roadside Assistance
- RV Mobile Mechanic
- Shocks & Struts
- Starters & Alternators
- Tow Truck
- Towing
- Truck Repair
- Your Mechanic
SERVICE AREA
74 Cities within 30 miles of Albuquerque, NM
Ainsworth, IA | Amana, IA | Atalissa, IA | Atkins, IA |Bennett, IA |Blairstown, IA |Cedar Rapids, IA | Center Junction, IA |Clarence, IA | Columbus City, IA | Columbus Junction, IA | Conesville, IA | Conroy, IA | Coralville, IA | Crawfordsville, IA | Ely, IA | Fairfax, IA | Fruitland, IA | Grandview, IA | Harper, IA | Hiawatha, IA | Hills, IA | Homestead, IA | Kalona, IA | Keota, IA | Letts, IA | Lisbon, IA | Lone Tree, IA | Lowden, IA | Marengo, IA | Marion, IA | Martelle, IA | Mechanicsville, IA | Middle Amana, IA | Morley, IA | Moscow, IA | Mount Vernon, IA | Muscatine, IA | New Boston, IL | Newhall, IA | Nichols, IA | North English, IA | North Liberty, IA | Norway, IA | Olin, IA | Ollie, IA | Oxford, IA | Oxford Junction, IA | Palo, IA | Parnell, IA | Richland, IA | Riverside, IA | Robins, IA | Shellsburg, IA | Solon, IA | South Amana, IA | South English, IA | Springville, IA | Stanwood, IA | Swisher, IA | Tiffin, IA | Tipton, IA | Van Horne, IA | Walford, IA | Wapello, IA | Washington, IA | Watkins, IA | Wellman, IA | West Branch, IA | West Chester, IA | West Liberty, IA | Williamsburg, IA | Wilton, IA | Wyoming, IA
Near Zip Codes: 52244 – Albuquerque, NM | 52242 – Albuquerque, NM | 52245 – Albuquerque, NM | 52243 – Albuquerque, NM | 52246 – Albuquerque, NM | 52235 – Hills, IA | 52241 – Coralville, IA | 52240 – Albuquerque, NM | 52340 – Tiffin, IA | 52317 – North Liberty, IA | 52327 – Riverside, IA | 52333 – Solon, IA | 52755 – Lone Tree, IA | 52247 – Kalona, IA | 52358 – West Branch, IA
VEHICLES SERVICED
Cummins Mobile Mechanic | Freightliner Mobile Mechanic |International Mobile Mechanic |Peterbilt Mobile Mechanic| Cascadia Mobile Mechanic |Western Star Mobile Mechanic |Heavy Duty Mobile Mechanic |Semi-Trailer Mobile Mechanic | Semi-Trailer Mobile Mechanic |Mack Mobile Mechanic | Kenworth Mobile Mechanic |Acura Mechanic | Audi Mechanic | BMW Mechanic | Buick Mechanic | Cadillac Mechanic | Chevrolet | Chrysler Mechanic | Daewoo Mechanic | Dodge Mechanic | Eagle Mechanic | Fiat Mechanic | FordMechanic | GMC Mechanic | Geo Mechanic | Honda Mechanic | Hummer Mechanic | Hyundai Mechanic | Infiniti Mechanic | Isuzu Mechanic | Jaguar Mechanic | Jeep Mechanic | Kia Mechanic | Land Rover Mechanic | Lexus Mechanic | NM City Mechanic | Mazda Mechanic | Mercedes Benz Mechanic | MercuryMechanic | Mini Mechanic | Mitsubishi Mechanic | NissanMechanic | Oldsmobile Mechanic | Plymouth Mechanic | Pontiac Mechanic | Porsche Mechanic | SaabMechanic | Saturn Mechanic | Scion Mechanic | Smart | Subaru Mechanic | Suzuki | Toyota Mechanic | Volkswagen Mechanic | Volvo Mechanic
SERVICES
Mobile 30/60/90/120 Mile Services | Mobile Mechanic Ac / Heat Repair | Mobile Air Conditioning Repair & Service | Air Filter Repair Replacement | Mobile Mechanic Alternator Repair & Replacement | Antilock Braking System (Abs) Repair | Auto Maintenance | Axle Repair & Replacement | Battery Check And Replacement | Mobile Mechanic Belt Repair & Replacement | Bicycle Repair | Bike Repair | Boat Repair | Mobile Mechanic Brake Repair | Catalytic Converter Repair | Chassis & Suspension Repair | Check Engine Light Diagnostics & Repair | Clutch Repair & Replacement | Clutch, Gearbox And Shaft Repair | Compressor Repair & Replacement | Computer Diagnostic | Cooling System Repair And Replacement | Diagnosis | Diesel Repair | Differential Diagnosis | Differential Rebuild & Service | Dmv Certified Vehicle Inspection & Repairs | Dot Inspections | Mobile Mechanic Drivability Diagnostics & Repair | Driveline Repair & Maintenance | Driveshaft & U-Joint Repair |Mobile Mechanic Electric Window Repair | Electrical System Diagnostics & Repair | Emergency Auto Repair | Emergency Gas Delivery | Emission Testing | Mobile Mechanic Engine & Components Repair Replacement | Engine Management System Check | Engine Performance Check |Engine Repair | Engine Replacement |Mobile Mechanic Engine Swap | Evaporator Repair & Replacement | Exhaust Manifold Repair | Exhaust Repair & Replacement | Factory Scheduled Maintenance | Mobile Mechanic Filter Replacements |Mobile Mechanic Flat Tire Changes | Mobile Mechanic Fluid Services | Flywheel Repair & Replacement | Fuel Delivery | Fuel Injection Or Fuel Filter Repair | Fuel Pump Repair | Fuel System Repair & Maintenance | Gaskets, Belts, Hoses Repair Replacement | Mobile Mechanic Headlight Repair Replacement | Heating & Cooling System Diagnostics | Heating And Air Conditioning Repair | Ignition And Fuel Injection System | Jump Start |Mobile Light Repair & Bulb Replacements | Lockout Services | Maintenance Inspections | Mirrors And Accessories Replacement | Mobile Auto Repair | Mobile Mechanic | Mobile Truck Repair | Moped Repair | Muffler Repair & Replacement | Mobile Oil Change | Out Of Gas Help | Power Accessory Repair | Power Antenna Repair | Mobile Mechanic Power Lock Repair | Mobile Power Steering Repair | Power Window Repair | Mobile Mechanic Pre-Purchase Inspection | Mobile Mechanic Preventative Maintenance | Radiator Repair & Replacement | Mobile Radiator Repair Replacement | Refrigerant Replacement | Roadside Assistance | Rv Repair | Safety & Emissions Inspections | Mobile Mechanic Semi Truck Repair | Serpentine Belt Repair | Mobile Shocks & Struts Repair | Starter/ Solenoids Repair Replacement | State Emission Inspections & Repairs | Steering System Repair | Suspension – Shocks And Struts Repair Replacement | Mobile Mechanic Taillight Repair | Timing Belts Repair Replacement | Mobile Mechanic Tire Air Pressure Checks | Mobile Tire Balancing | Mobile Mechanic Tire Installations | Mobile Mechanic Tire Replacement | Tire Rotation | Toolbox Transportation | Mobile Transmission Fluid Service | Transmission Flush | Transmission Repair & Service | Truck Maintenance | Tune Ups | Mobile Used Car Inspection | Vehicle Inspection | Water Pump Repair & Replacement | Wheel Alignment | Winching Service |Mobile Windshield Wiper Blades | Mobile Windshield Wiper Repair
BEST TOWING, MOBILE MECHANIC, TOWING AND ROADSIDE ASSISTANCE , MOBILE MECHANICS REPAIR COMPANIES IN IOWA
ALBUQUERQUE NM TOWING & ROADSIDE ASSISTANCE (319) 471-4590 roadsideassistanceiowacity.org
MOBILE MECHANICS OF ALBUQUERQUE NM (319) 359-6136 mobileautotruckrepairiowacity.org
TOWING SERVICES OF ALBUQUERQUE NM (319) 471-4238 towingiowacity.org
VEHICLES WE SERVICE:
Acura TL TLX NSX RDX MDX ILX RLX
Audi A4 A3 A6 A8 Q5 TT Q3 A5 R8 S6 RS S5 E-TRON
BMW i8 M5 M6 M550 M8 GRAN COUPE M240
Buick Enclave Encore LaCrosse Envision Cascada Regal
Cadillac CTS Escalade XT6 XT5 ATS CT6 CTS-V XTS XT4 CT5
Chevrolet Camaro Corvette Cruze Spark Tahoe malibu Colorado Traverse Suburban Impala Eqinox Blazer EV
Volt Sonic
Chrysler 300 Voyager Pacifica
Dodge Challenger Durango Journey Charger Grand Caravan
Fiat 500 500c 500x Spider
Ford Fiesta Fusion Taurus
GMC Yukon Sierra 1500 Acadia Terrain Canyon Yukon XL Savana Sierra 2500
Honda Civic Fit CR-V Accord HR-V Odyssey Insight Pilot Passport Ridgeline
Hyundai Tuscon Elantra Kona Santa Fe Accent Sonata Veloster Venue NMXO Palisade Ioniq Elantra
Infiniti Q50 QX80 QX50 QX60 Q60 QX30 Q70 Q70L M Q45 Q40
Jaguar XE XF XJ F-TYPE I-PACE E-PACE F-PACE
Jeep Wrangler Grand Cheroke Compass Renegade Gladiator
Kia Sportage Sorento Rio Optima Stinger Sedona Telluride Soul Forte K900 Cadenza EV
Land Rover Range Rover Defender Discovery Velar
Lexus IS ES GS GS F LS UX NX HYBRID RC LC UX 250 350
Lincoln Aviator MKC MKZ Navigator Continental MKT Corsair MKZ Hybrid
Mazda CX-5 Mazda3 Mazda6 MX-5 Miata CX-3 CX-30 CX-9 RF
Mercedes-Benz A-Class C-Class CLS E-Class CLA CLS
Mini Cooper Countryman Clubman
Mitsubishi Outlander Mirage Eclipse Galant Lancer Diamante Evolution Ralliart G4 VRX Olympic
Nissan GT-R LEAF Frontier Sentra Altima Pathfinder Maxima Murano Kicks Versa Rogue Titan NV200 Armada Versa Note Titan NV Cargo
Porsche 911 Cayenne Panamera Marcan Taycan 718 Cayman Boxster Turismo
Scion Yaris Corrolla XB FR-S TC XA XD IQ
Subaru BRZ Crosstrek Forester WRX Legacy Impreza Outback Ascent STI
Tesla Model 3 s x y
Toyota Corolla RAV4 C-HR Camry Land Cruiser Yaris Prius 86 Supra Highlander Tacoma Tundra Prius-C
4runner Sienna Mirai Avalon Sequoia
Volkswagen Golf Passat E-Golg Tiguan Beetle Jetta Arteon
Volvo XC90 XC60 S60 XC40 V60 V90 S90