Best Bike Trainer Assembly And Setup Service In NM City
Mobile Auto Truck Repair NM City
Bike Trainer Assembly And Setup Service near NM City: Are you looking for the BestBike Trainer Assembly And Setup Service near NM City ? Mobile Auto Truck Repair NM City, most trainers come with a skewer that is designed to work best with the trainer; just swap out your original skewer for the one that came with the trainer. This insures the best fit, and it also keeps your nice original skewer from getting scratched up by the clamping mechanism. Cost? Free estimates! Send us a message or call us today. Best Bike Trainer Assembly And Setup Service around NM City. We serve NM Cityand other areas. Get a Free Quote Now!
BEST BIKE TRAINMR ASSEMBLY AND SETUP SERVICE IN ALBUQUERQUE NM IA
ALBUQUERQUE NMBIKE TRAINMR ASSEMBLY AND SETUP
Bike Trainer assembly And Setup At Mobile Auto Truck Repair NM City
Bike Trainer Assembly And Setup Service near NM City: Don’t let winter put a damper on your training routine. The following tips will make you a fitter and stronger rider, and get you ready for your first event come springtime winter is here and, as we found out with the finale of Game of Thrones, it’s often a pretty grim outlook. Not least when it comes to keeping on top of your fitness and training regime.Mobile Auto Truck Repair NM City, luckily, indoor training has helped provide a platform to get you through the cold, dark winter months ensuring you come out the other side well prepared for the next event.
With the advancement in technology and the introduction of smart indoor trainers, Watt Bikes and online training platforms such as Zwift, training indoors has become one of the most effective ways of preparing for an event.
Mobile Auto Truck Repair NM City,one of the biggest misconceptions associated with indoor training is that each session has to be hard or fast. In fact, indoor training should follow the same structure and recipe as an outdoor session.
Choose the Right Trainer
A bike trainer is a device that clamps onto your rear axle and presses a resistance roller against the rear tire so that you can ride in place. They come in three basic categories:
- Wind trainer: Less popular today and thank goodness, as the resistance generated from its small fan isn’t as loud as a 747 at takeoff, but it’s far from silent.
- Mag trainer: A bit more expensive and quieter.
- Fluid trainer: More expensive and quieter than its Mag brethren.
Most trainers are durable. It’s a worthwhile investment and a device that will serve you well for years to come. Buy a steel skewer for your rear wheel so that the bike sits more securely in the trainer’s clamp, but most new trainers come with this. Also buy a wheel block that raises the front wheel, leveling off the bicycle, but this can be faked with something like a phone book.
The great thing about indoor trainers is that…
There are no interruptions on a trainer like there are on the road no stop lights, no delays. Just get on and go! This adds value to the ride, so a 50-minute ride on the trainer is equal to an hour outside.
The same basics apply here as in any workout. Start with a warm-up of 10-12 minutes. Put in some technical focus for three to five minutes. Perform the main body of your workout, and then follow with seven to 10 minutes of cool-down. Three rides a week in the winter will keep you in shape and improve your bike ability.
Drill ride. The main body consists of four sets of 30-second one-footers, with two minutes of recovery. To perform a one-footer, remove one cleat from the pedal and rest that foot safely on the frame of the trainer. Concentrate on 30 seconds of smooth, fluid circles using just one foot. Switch feet and take two minutes of easy spin with both feet as recovery. The next drill is four 30-second spin-ups with two minutes’ recovery. To perform a spin-up, start at 90 rpm in a moderate gear. Gradually increase your cadence to 95, 100, 105 rpm and so on while still in that same gear. After 15 seconds of increasing cadence, get to your fastest spin which is still very smooth (no hopping around in the saddle) and hold that for 15 seconds. Take a full two minutes of easy circles between each for recovery.
Interval ride. After a solid warm-up, shift into a higher gear and commit to going very strong for two minutes. You can determine how intense that effort should be with a heart rate monitor, by rate of perceived effort or by breath rate. Then, spin easy for three minutes. Start with three rounds, and as fitness develops, go to four or five rounds. After that, increase the duration of the effort. Eventually, reduce the recovery time.
Steady state. After a solid warm-up, settle into a pace that will last 15-30 minutes. Make this a challenge, but not nearly as intense as the effort in the interval ride. Again, use either heart rate, perceived effort or breath rate to decide on the intensity. Hold this effort steady and strong for the full duration, and concentrate on good pedaling mechanics. Be sure to leave plenty of time for a quality cool-down.
Why Train with a Bike Trainer: 4 Golden Rules of Indoor Riding
Bike Trainer Assembly And Setup Service near NM City: Let’s investigate its role in performance preparation, including some positive aspects of indoor trainer riding, and aspects of riding you simply cannot effectively work on by being inside.
What You Cannot Achieve on a Trainer
Rather than simply mounting a case for all the benefits of indoor riding, let’s first acknowledge some aspects you won’t get to effectively work on while bolted to the floor:
- Handling Skills: All basic, yet important, interactions with the bicycle are not replicated when on a trainer. You cannot develop a sense of balance, braking, cornering, descending etc. These are interactions that are so often lacking among triathletes, so we must realize that plenty of outside riding, with focus on these fundamental skills, will be beneficial for you.
- Terrain Management: Using gears and pedal stroke to effectively manage rolling terrain, descents and climbs cannot truly be developed on a trainer. With some of the software improvements, it is getting closer, but the true intuition and developing of feeling is only achieved outside.
- Standing Out of the Saddle: An important skill to develop to effectively manage terrain, short postural load, but also nail the counter-steering effect that is utilized in cornering, riding in the wind and other interactions, yet impossible to develop when riding on a trainer that holds the bike in place laterally.
These three main categories require outside riding to truly develop, and should not be ignored. With this said, getting inside and onto the trainer does offer some valuable opportunity.
The Benefits of the Bicycle Trainer
Bike Trainer Assembly And Setup Service near NM City:So you cannot work on standing or cornering, your terrain management won’t improve, and you won’t effectively stand out of the saddle. It doesn’t mean the trainer is a limited tool. In fact, far from it. Your trainer is a wonderful tool in your training arsenal. Here are some of the opportunities with riding the trainer:
- Effective Training in a Controlled Environment: Specific interval training becomes highly effective without the natural variability of the terrain of outside. There is no coasting on a trainer, hence why many like to make the claim that 60 minutes of trainer time is worth more than 60 minutes outside. You have a controlled environment, to nail specific intervals, without any coasting effect. I promise you will never run out of a hill when doing low rpm hill reps’ on a trainer.
- Pedal Stroke and Posture: Without the requirement to manage your bike around traffic, terrain and other riders, the trainer provides the optimal environment to work on your pedal stroke and retaining proper posture. Including a mirror in your set up, for self-guided feedback, can begin the habit that, from minute one until the end of the session, you do things well.
This means form over force, and every interval can be achieved while retaining proper posture. This is so critical, as performance in triathlon cycling is as much about retaining form under fatigue, and establishing a great habit of riding well, despite fatigue, will carry across to race day.
- Specificity of Intervals: We tend to prescribe training as a combination of effort (power, RPE or heart rate) with a wide range of specific RPM play. A backbone of our training is what we label as end of range’. Many intervals are either very low cadence, or strength-endurance as we call it, as well as some very high RPM work at the top end.
It can be a challenge to ride to suitable terrain outside, but the trainer offers immediate and controllable intervals in which you can mimic sustained efforts to train physiology, without the limiter of your terrain.
The Golden Rules
When adopting the use of a cycling trainer, we have a few golden rules for all riders to follow.
- Always ride with great posture. There is no excuse for riding with locked elbows, tense shoulders, and hips rotated back on your seat. Ride like the rider you want to be. If you ingrain positive postural habits, they will be there on the race course.
- Make your pedal stroke fluid. We always coach the cue tension on the chain. When riding inside, you have the chance to understand, appreciate and apply fluid and smooth pedaling. If you are a quad-focused rider, you can feel and “see” the chain bouncing. An opportunity for refinement and becoming a more fluid rider.
- Execute the intent. You have a controlled environment, execute your training as intended. For me, this is the intended output, but also at the cadence (RPM) that is the goal of an interval.
- Take it outside. Whenever you are riding inside, always keep a lens on how this applies to my outside riding. Your races and events are outside, so join the dots on how your effort applies to becoming a better outside rider.
In short, embrace the trainer. It is a wonderful tool in your performance arsenal, but remember that your ultimate mission is to become a better bike rider outside. Utilizing the benefits of the trainer, then applying those habits, lessons and intervals to the outside world is your optimal performance lens to frame its role in your overall development and race readiness.
Do you have a smart bike trainer? What kind? If not, which one is on your wish list? Call us Today Mobile Auto Truck Repair NM City.
TIPS
Bike Trainer Assembly And Setup Service near NM City: Winter is the time of the year when many cyclists turn to indoor training to get in their riding fix and stay in shape. Here are 5 Tips to help you get the most out of your indoor cycling experience:
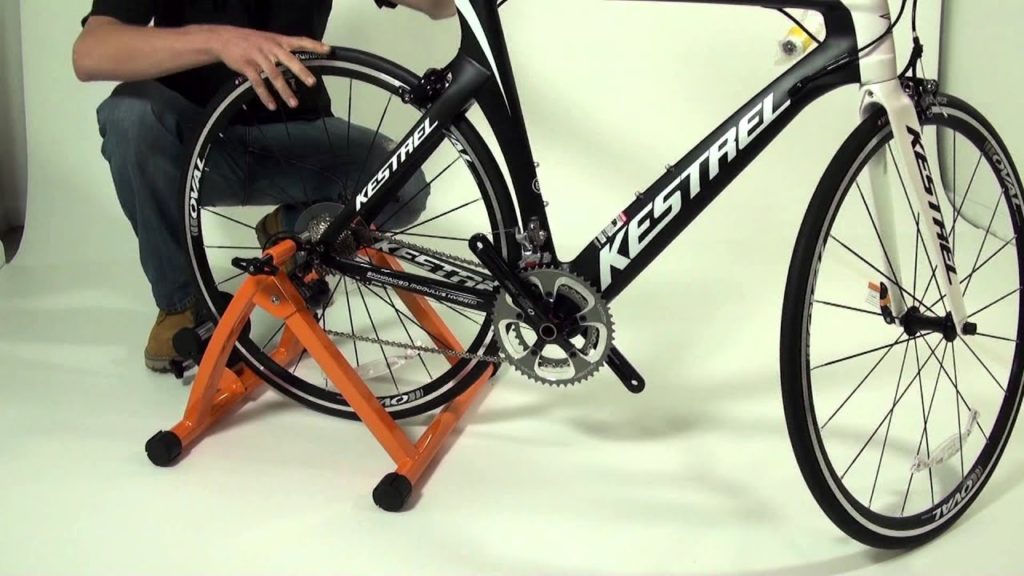
Properly set up your bike on the trainer.
Indoor Training Read and follow the instructions that came with your indoor trainer carefully to be sure that your bicycle is attached safely and securely. If you still have questions about the correct way to set up the system, check with the local bike shop where you bought it.
Most trainers have a clamp that holds both sides of the quick release skewer on your rear wheel. In fact, most trainers come with a skewer that is designed to work best with the trainer; just swap out your original skewer for the one that came with the trainer. This ensures the best fit, and it also keeps your nice original skewer from getting scratched up by the clamping mechanism.
Adjust the position of the roller on the resistance unit so that you find the “sweet spot” where it contacts your rear tire. You want the roller/tire contact point to be tight enough so that the tire does not slip as you pedal, but not so tight that it significantly increases the resistance provided by the trainer mechanism itself.
Use a front wheel stabilizing block.
The trainer unit will lift your rear wheel off of the floor by a couple of inches. The stabilizer block (or riser block) lifts your front wheel up so that your bike stays at the normal, level riding position. A side benefit is that it keeps your front wheel from swaying side-to-side, so you don’t have to worry about actively keeping your handlebars straight while you pedal.
Do something to keep it interesting.
You’re more likely to stick with your training plan if you can keep it from getting boring. Set up your bike and trainer in front of the TV to catch up on your favorite sitcoms, movies, the news, or sports events. Or, crank up your favorite motivational music. Some people even catch up on reading by putting a book or magazine on a stand in front of their bike.
Dress like you’re riding outside on a hot day.
Wear the same cycling-specific clothes that you normally wear for your outdoor riding, i.e. cycling shorts, jersey, and shoes (your helmet is optional, unless you don’t follow Tip #1!). These clothes provide the same benefits of comfort and moisture management indoors as they do outdoors.
Listen to the rhythm of your wheel.
Whether you’re riding indoors or out, you should always think about pedaling in a circular motion. This may sound obvious; since your pedals move in a circle no matter what, how can you do otherwise? The term “pedaling in circles” means that you should concentrate and visualize applying a smooth, even pressure throughout the entire stroke of your pedaling, as opposed to a pumping up-and-down force.
COST
Bike Trainer Assembly And Setup Service near NM City: If this year taught us anything, it is that we should all have ways to get quality workouts inside our own homes.
While the smart bike trainer phenomenon had been gradually building for years, a worldwide pandemic really shifted it into high gear. Waits for new smart trainer units hit three months at one point, and the popular streaming service, Peloton, saw its stock price shoot from $19 to $91 dollars per share.
Why the popularity? Pairing a turbo trainer that can connect to apps like Zwift or Peloton makes for an entirely different indoor cycling experience. For those who do at least some of their riding and training indoors, it is probably safe to say this new technology is a game changer.
We could probably do a piece on smart bike trainers, and then another piece on all of the apps available to someone who wanted to do smart cycling workouts. We decided, however, that it would be most useful to our readers if we put them together, in the same article, because one feeds off the other.
When we started doing a roundup on the market of smart bike turbo trainers, smart stationary bikes, and the apps that go with them, our head began to spin. The choices, and the number of if-then statements, can be a bit overwhelming. We will do our best to simplify everything into plain terms.
What Will This Setup cost?
This is where it gets complicated.
To do this right, the upfront investment can cost anywhere from about $600 (for a smart trainer, assuming you have your own bike to put on it) to $2,200 (for a Peloton stationary bike). There is also a way you can rig up a non-smart trainer to have some level of feedback to the program, but you will miss out on some of the two-way benefits. To enjoy the latest technology, we recommend not buying anything more than a year or so old, since the engineering is advancing so quickly right now.
The streaming programs (or apps), in order to truly be compatible with the trainers, will have a cost as well. We have seen a monthly cost ranging from $10 to $40. Compared to the price of spin classes at a health club, that is highly competitive, especially when you consider that the app will be on-demand and have hundreds of routes and workouts to choose from. Popular examples are Zwift or Suffer fest.
We did not want to stream everything on a phone or iPad, so our setup involved an investment in the AppleTV device as well, allowing you to stream an app directly to any TV. That ran about $170.
There are a few more things we will outline below but those two things are your big costs. Pick a trainer, pick a streaming program, and make sure they are compatible with each other. Why Would I Even Use a Smart Trainer?
That one is easy. Smart trainers allow you to train on your own bike (versus a gym bike or a stationary bike) in the comfort and safety of your own home. Probably the most common situation is a cyclist who wants to train on their road or tri bike during the winter, and in colder climates. But we encounter riders who are tired of battling traffic, or hesitant to do their rides during rush hour or in low-light conditions in the early morning or evening.
FREQUENTLY ASKED QUESTIONS
What’s included with Bike Trainer Assembly and Setup?
- Assembling one customer-supplied bike trainer
- Installing customer’s bike to trainer
- Unit test and clean up
Do I have to assemble my bike trainer?
No, your trainer comes fully assembled.
Can I see your Bike Trainers or rollers in stores?
No, we sell our bike trainers and rollers directly which is how we are able to provide our amazing prices.
Is my warranty transferable?
Like most manufacturers, our warranty is not transferable. It is valid only for the original purchaser.
Do I have to be home to accept delivery?
No, you do not need to be home for delivery.
What happens next?
You’ll get an email from your pro to confirm the date, time, and other details regarding your bike trainer assembly. Please be prepared to provide your pro the exact product name of the bike trainer you need assembled, or even better the Amazon product URL. Assembly times for bike trainers can vary by model.
Why should I hire a pro to assemble my bike trainer?
Allowing a professional to assemble your bike trainer for you saves you time, and frees you from the hassle of interpreting unclear assembly instructions or keeping track of stray parts and hardware. A pro will have the right tools and experience to do the assembly quickly, correctly, and safely the first time.
Is a trainer bad for your bike?
While the riding on a trainer will damage your carbon frame myth has been officially busted, indoor riding can still pose a threat to your bike in two ways: wheel strain and sweat corrosion. We’ve put together an exhaustive list of common trouble spots reported by riders who train regularly on Zwift.
CALL US FOR:
- Bike Trainer Assembly And Setup Service Near NM City
- How To Assemble Indoor Bike Trainer
- How To Set Up Bell Motivator Mag Indoor Bicycle Trainer
- How To Attach Bike To Trainer
- How To Install Bike Trainer Skewer
- How To Set Up A Bike Trainer
- Bell Motivator Indoor Bicycle Trainer Manual
- How To Use An Indoor Bike Trainer
- Video Bike Trainer Near NM City
- Indoor Bike Trainer Stand
- Turn Bike Into Stationary Bike DIY
- How To Turn A Bike Into A Stationary Bike Without Trainer
- Best Indoor Bike Trainer Stand
- Fdw Bike Trainer Manual
- Songmics Indoor Bike Trainer Stand
- Indoor Cycling Conversion Stand
- Stationary Bike Stand For Indoor Riding Near NM City
Service Area
- Coralville Bike Trainer Assembly And Setup near me
- Hills Bike Trainer Assembly And Setup near me
- NM City Bike Trainer Assembly And Setup near me
- Johnson County Bike Trainer Assembly And Setup near me
- Kalona Bike Trainer Assembly And Setup near me
- Lone Tree Bike Trainer Assembly And Setup near me
- North Liberty Bike Trainer Assembly And Setup near me
- Oxford Bike Trainer Assembly And Setup near me
- Riverside Bike Trainer Assembly And Setup near me
- Solon Bike Trainer Assembly And Setup near me
- Swisher Bike Trainer Assembly And Setup near me
- Tiffin Bike Trainer Assembly And Setup near me
- University Heights Bike Trainer Assembly And Setup near me
- West Branch Bike Trainer Assembly And Setup near me
- West Liberty Bike Trainer Assembly And Setup near me
BEST BIKE TRAINMR ASSEMBLY AND SETUP SERVICE IN ALBUQUERQUE NM IA
MOBILE MECHANICS REPAIR ALBUQUERQUE NM
REQUEST MORE INFORMATION. CONTACT US NOW!
Contact Details
Mobile Mechanic Service Albuquerque
Best Mobile Mechanic & Mobile Auto Truck Repair in NM City NM
CALL: (505) 485-1736 MOBILE MECHANIC 1
CALL: (319) 359-6136 MOBILE MECHANIC 2
CALL: (319) 471-4590 TOWING & ROADSIDE ASSISTANCE
OPEN 7 days 24 Hours
SERVICE AREA: NM City
ABOUT US
Mobile Mechanic NM City: Since 2018 MOBILE MECHANICS REPAIR ALBUQUERQUE NM has been providing reliable mobile repair services to NM City and surrounding areas. Our mechanics cover a 75 mile radius around NM City and are capable of handling any vehicle problems you may have with your truck, RV, or car. We provide mobile mechanic services 24/7 and we’re just a call away from getting you going again.
Onsite Automobile Mechanic NM City: With our traveling mechanic service, we will come to your aid and rescue. We can help and get you and your car back on the road. Mobile Auto Repair, We Bring the shop to you. Onsite car and automobile 911 repair service. Your Car’s local emergency services on the go near Albuquerque, NM.
#mobilemechanicNMCity
#mobileautorepairNMCity
#mobiletruckrepairNMCity
#onsiteautorepairNMCity
#roadsideassistanceNMCity
#24hourautorepairNMCity
#24hourtruckrepairNMCity
CALL US FOR
- 24 Hour Auto Repair
- 24 Hour RV Repair
- 24 Hour Truck Repair
- Auto Repair Shop
- Auto Repair Shops and Mechanics
- Batteries
- Car Repair
- Car Repair and Maintenance
- Car Service
- Emergency Auto Services
- Flat Tire Repairs
- Jumpstarts
- Mechanic
- Mobile Mechanic for Cars
- Mobile Mechanic for RVs
- Mobile Mechanic for Trucks
- Mobile Repair
- Mobile Welding
- On Site Auto Repair
- On Site Brake Repair
- Radiators
- Roadside Assistance
- RV Mobile Mechanic
- Shocks & Struts
- Starters & Alternators
- Tow Truck
- Towing
- Truck Repair
- Your Mechanic
SERVICE AREA
74 Cities within 30 miles of Albuquerque, NM
Ainsworth, IA | Amana, IA | Atalissa, IA | Atkins, IA |Bennett, IA |Blairstown, IA |Cedar Rapids, IA | Center Junction, IA |Clarence, IA | Columbus City, IA | Columbus Junction, IA | Conesville, IA | Conroy, IA | Coralville, IA | Crawfordsville, IA | Ely, IA | Fairfax, IA | Fruitland, IA | Grandview, IA | Harper, IA | Hiawatha, IA | Hills, IA | Homestead, IA | Kalona, IA | Keota, IA | Letts, IA | Lisbon, IA | Lone Tree, IA | Lowden, IA | Marengo, IA | Marion, IA | Martelle, IA | Mechanicsville, IA | Middle Amana, IA | Morley, IA | Moscow, IA | Mount Vernon, IA | Muscatine, IA | New Boston, IL | Newhall, IA | Nichols, IA | North English, IA | North Liberty, IA | Norway, IA | Olin, IA | Ollie, IA | Oxford, IA | Oxford Junction, IA | Palo, IA | Parnell, IA | Richland, IA | Riverside, IA | Robins, IA | Shellsburg, IA | Solon, IA | South Amana, IA | South English, IA | Springville, IA | Stanwood, IA | Swisher, IA | Tiffin, IA | Tipton, IA | Van Horne, IA | Walford, IA | Wapello, IA | Washington, IA | Watkins, IA | Wellman, IA | West Branch, IA | West Chester, IA | West Liberty, IA | Williamsburg, IA | Wilton, IA | Wyoming, IA
Near Zip Codes: 52244 – Albuquerque, NM | 52242 – Albuquerque, NM | 52245 – Albuquerque, NM | 52243 – Albuquerque, NM | 52246 – Albuquerque, NM | 52235 – Hills, IA | 52241 – Coralville, IA | 52240 – Albuquerque, NM | 52340 – Tiffin, IA | 52317 – North Liberty, IA | 52327 – Riverside, IA | 52333 – Solon, IA | 52755 – Lone Tree, IA | 52247 – Kalona, IA | 52358 – West Branch, IA
VEHICLES SERVICED
Cummins Mobile Mechanic | Freightliner Mobile Mechanic |International Mobile Mechanic |Peterbilt Mobile Mechanic| Cascadia Mobile Mechanic |Western Star Mobile Mechanic |Heavy Duty Mobile Mechanic |Semi-Trailer Mobile Mechanic | Semi-Trailer Mobile Mechanic |Mack Mobile Mechanic | Kenworth Mobile Mechanic |Acura Mechanic | Audi Mechanic | BMW Mechanic | Buick Mechanic | Cadillac Mechanic | Chevrolet | Chrysler Mechanic | Daewoo Mechanic | Dodge Mechanic | Eagle Mechanic | Fiat Mechanic | FordMechanic | GMC Mechanic | Geo Mechanic | Honda Mechanic | Hummer Mechanic | Hyundai Mechanic | Infiniti Mechanic | Isuzu Mechanic | Jaguar Mechanic | Jeep Mechanic | Kia Mechanic | Land Rover Mechanic | Lexus Mechanic | NM City Mechanic | Mazda Mechanic | Mercedes Benz Mechanic | MercuryMechanic | Mini Mechanic | Mitsubishi Mechanic | NissanMechanic | Oldsmobile Mechanic | Plymouth Mechanic | Pontiac Mechanic | Porsche Mechanic | SaabMechanic | Saturn Mechanic | Scion Mechanic | Smart | Subaru Mechanic | Suzuki | Toyota Mechanic | Volkswagen Mechanic | Volvo Mechanic
SERVICES
Mobile 30/60/90/120 Mile Services | Mobile Mechanic Ac / Heat Repair | Mobile Air Conditioning Repair & Service | Air Filter Repair Replacement | Mobile Mechanic Alternator Repair & Replacement | Antilock Braking System (Abs) Repair | Auto Maintenance | Axle Repair & Replacement | Battery Check And Replacement | Mobile Mechanic Belt Repair & Replacement | Bicycle Repair | Bike Repair | Boat Repair | Mobile Mechanic Brake Repair | Catalytic Converter Repair | Chassis & Suspension Repair | Check Engine Light Diagnostics & Repair | Clutch Repair & Replacement | Clutch, Gearbox And Shaft Repair | Compressor Repair & Replacement | Computer Diagnostic | Cooling System Repair And Replacement | Diagnosis | Diesel Repair | Differential Diagnosis | Differential Rebuild & Service | Dmv Certified Vehicle Inspection & Repairs | Dot Inspections | Mobile Mechanic Drivability Diagnostics & Repair | Driveline Repair & Maintenance | Driveshaft & U-Joint Repair |Mobile Mechanic Electric Window Repair | Electrical System Diagnostics & Repair | Emergency Auto Repair | Emergency Gas Delivery | Emission Testing | Mobile Mechanic Engine & Components Repair Replacement | Engine Management System Check | Engine Performance Check |Engine Repair | Engine Replacement |Mobile Mechanic Engine Swap | Evaporator Repair & Replacement | Exhaust Manifold Repair | Exhaust Repair & Replacement | Factory Scheduled Maintenance | Mobile Mechanic Filter Replacements |Mobile Mechanic Flat Tire Changes | Mobile Mechanic Fluid Services | Flywheel Repair & Replacement | Fuel Delivery | Fuel Injection Or Fuel Filter Repair | Fuel Pump Repair | Fuel System Repair & Maintenance | Gaskets, Belts, Hoses Repair Replacement | Mobile Mechanic Headlight Repair Replacement | Heating & Cooling System Diagnostics | Heating And Air Conditioning Repair | Ignition And Fuel Injection System | Jump Start |Mobile Light Repair & Bulb Replacements | Lockout Services | Maintenance Inspections | Mirrors And Accessories Replacement | Mobile Auto Repair | Mobile Mechanic | Mobile Truck Repair | Moped Repair | Muffler Repair & Replacement | Mobile Oil Change | Out Of Gas Help | Power Accessory Repair | Power Antenna Repair | Mobile Mechanic Power Lock Repair | Mobile Power Steering Repair | Power Window Repair | Mobile Mechanic Pre-Purchase Inspection | Mobile Mechanic Preventative Maintenance | Radiator Repair & Replacement | Mobile Radiator Repair Replacement | Refrigerant Replacement | Roadside Assistance | Rv Repair | Safety & Emissions Inspections | Mobile Mechanic Semi Truck Repair | Serpentine Belt Repair | Mobile Shocks & Struts Repair | Starter/ Solenoids Repair Replacement | State Emission Inspections & Repairs | Steering System Repair | Suspension – Shocks And Struts Repair Replacement | Mobile Mechanic Taillight Repair | Timing Belts Repair Replacement | Mobile Mechanic Tire Air Pressure Checks | Mobile Tire Balancing | Mobile Mechanic Tire Installations | Mobile Mechanic Tire Replacement | Tire Rotation | Toolbox Transportation | Mobile Transmission Fluid Service | Transmission Flush | Transmission Repair & Service | Truck Maintenance | Tune Ups | Mobile Used Car Inspection | Vehicle Inspection | Water Pump Repair & Replacement | Wheel Alignment | Winching Service |Mobile Windshield Wiper Blades | Mobile Windshield Wiper Repair
BEST TOWING, MOBILE MECHANIC, TOWING AND ROADSIDE ASSISTANCE , MOBILE MECHANICS REPAIR COMPANIES IN IOWA
ALBUQUERQUE NM TOWING & ROADSIDE ASSISTANCE (319) 471-4590 roadsideassistanceiowacity.org
MOBILE MECHANICS OF ALBUQUERQUE NM (319) 359-6136 mobileautotruckrepairiowacity.org
TOWING SERVICES OF ALBUQUERQUE NM (319) 471-4238 towingiowacity.org
VEHICLES WE SERVICE:
Acura TL TLX NSX RDX MDX ILX RLX
Audi A4 A3 A6 A8 Q5 TT Q3 A5 R8 S6 RS S5 E-TRON
BMW i8 M5 M6 M550 M8 GRAN COUPE M240
Buick Enclave Encore LaCrosse Envision Cascada Regal
Cadillac CTS Escalade XT6 XT5 ATS CT6 CTS-V XTS XT4 CT5
Chevrolet Camaro Corvette Cruze Spark Tahoe malibu Colorado Traverse Suburban Impala Eqinox Blazer EV
Volt Sonic
Chrysler 300 Voyager Pacifica
Dodge Challenger Durango Journey Charger Grand Caravan
Fiat 500 500c 500x Spider
Ford Fiesta Fusion Taurus
GMC Yukon Sierra 1500 Acadia Terrain Canyon Yukon XL Savana Sierra 2500
Honda Civic Fit CR-V Accord HR-V Odyssey Insight Pilot Passport Ridgeline
Hyundai Tuscon Elantra Kona Santa Fe Accent Sonata Veloster Venue NMXO Palisade Ioniq Elantra
Infiniti Q50 QX80 QX50 QX60 Q60 QX30 Q70 Q70L M Q45 Q40
Jaguar XE XF XJ F-TYPE I-PACE E-PACE F-PACE
Jeep Wrangler Grand Cheroke Compass Renegade Gladiator
Kia Sportage Sorento Rio Optima Stinger Sedona Telluride Soul Forte K900 Cadenza EV
Land Rover Range Rover Defender Discovery Velar
Lexus IS ES GS GS F LS UX NX HYBRID RC LC UX 250 350
Lincoln Aviator MKC MKZ Navigator Continental MKT Corsair MKZ Hybrid
Mazda CX-5 Mazda3 Mazda6 MX-5 Miata CX-3 CX-30 CX-9 RF
Mercedes-Benz A-Class C-Class CLS E-Class CLA CLS
Mini Cooper Countryman Clubman
Mitsubishi Outlander Mirage Eclipse Galant Lancer Diamante Evolution Ralliart G4 VRX Olympic
Nissan GT-R LEAF Frontier Sentra Altima Pathfinder Maxima Murano Kicks Versa Rogue Titan NV200 Armada Versa Note Titan NV Cargo
Porsche 911 Cayenne Panamera Marcan Taycan 718 Cayman Boxster Turismo
Scion Yaris Corrolla XB FR-S TC XA XD IQ
Subaru BRZ Crosstrek Forester WRX Legacy Impreza Outback Ascent STI
Tesla Model 3 s x y
Toyota Corolla RAV4 C-HR Camry Land Cruiser Yaris Prius 86 Supra Highlander Tacoma Tundra Prius-C
4runner Sienna Mirai Avalon Sequoia
Volkswagen Golf Passat E-Golg Tiguan Beetle Jetta Arteon
Volvo XC90 XC60 S60 XC40 V60 V90 S90